
DieHard 12V Battery Charger and Engine Starter Manual: Article Plan
This comprehensive guide details operation, safety, and maintenance for DieHard 12V chargers, encompassing models like 71234, 200.713151, and 28.71221.
It covers both manual and fully automatic chargers, alongside engine starting procedures and a three-year warranty against defects in materials or workmanship.
Users will find instructions for charging, testing, and safely starting engines, alongside troubleshooting tips and fuse replacement guidance, all within this manual.
Welcome to the DieHard 12V Battery Charger and Engine Starter Manual! This document serves as your primary resource for safely and effectively utilizing your DieHard charger, whether you own a model like the 71234 automatic version, the 200.713151 fully automatic unit, or a 6V/12V manual charger (model 28.71221).
Before first use, carefully review this manual to understand the charger’s capabilities, safety precautions, and proper operating procedures. DieHard chargers are designed for reliable performance, offering features like battery charging, engine starting assistance, and even battery testing in some models.
This manual provides detailed instructions for various tasks, from preparing a battery for charging to safely jump-starting a vehicle. It also includes essential information regarding maintenance, troubleshooting common issues, and understanding the terms of your warranty. Proper adherence to these guidelines will ensure optimal performance and longevity of your DieHard product.
What is a DieHard 12V Battery Charger?
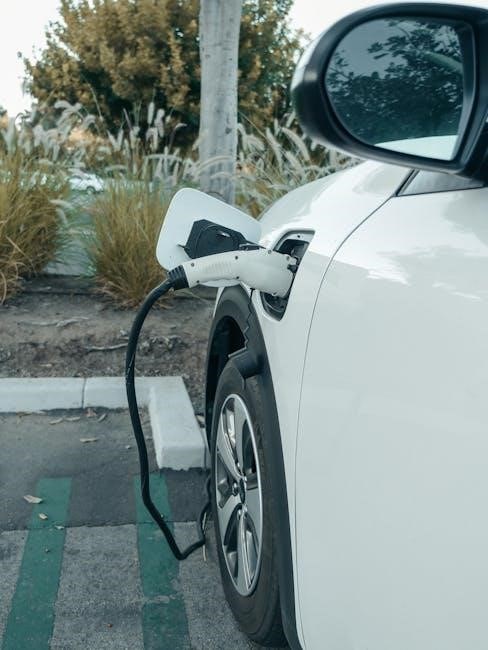
A DieHard 12V Battery Charger is a versatile power tool designed to restore and maintain the charge of 12-volt lead-acid batteries. These chargers, available in both manual (like model 28.71221) and fully automatic versions (such as 200.713151), cater to a wide range of battery types commonly found in cars, trucks, boats, and other vehicles.
Beyond simply charging, many DieHard models (e;g., 71234) also function as engine starters, providing a boost of power to jump-start vehicles with discharged batteries. Some even incorporate battery testing capabilities, allowing users to assess battery health and performance;
DieHard chargers are engineered for convenience and safety, often featuring GFCI outlets and automatic shut-off functions. They represent a reliable solution for maintaining optimal battery performance and ensuring vehicle readiness, offering a blend of power and user-friendly operation.
Key Features of DieHard 12V Chargers
DieHard 12V chargers boast a range of features designed for optimal battery care and user convenience. Many models, including the automatic versions, offer multi-stage charging, adapting to the battery’s needs for efficient and safe restoration. Engine starting functionality is a prominent feature, providing a quick jump-start solution.
Safety is paramount, with integrated GFCI (Ground Fault Circuit Interrupter) outlets protecting against electrical shock. Built-in battery testers allow for quick assessment of battery health, while automatic shut-off prevents overcharging.
DieHard chargers also offer versatility, supporting both 6V and 12V batteries (depending on the model). Their robust construction ensures durability, and the included owner’s manuals provide clear instructions for operation and maintenance, maximizing the charger’s lifespan and performance.

Safety Precautions
Prioritize safety by carefully reading all rules and instructions before each use, ensuring proper operation and preventing potential hazards with your DieHard charger.
General Safety Rules
Always read the complete operator’s manual before utilizing your DieHard 12V battery charger and engine starter; understanding all instructions is paramount for safe operation.
Maintain a clean and well-lit workspace, free from flammable materials like gasoline or solvents, to minimize fire risks during charging and starting procedures.
Never operate the charger with a damaged cord or plug; immediately replace any faulty components to prevent electrical shock or short circuits.
Avoid charging frozen batteries, as they may explode; ensure the battery is in a safe, temperature-controlled environment before attempting to charge.
Disconnect the charger from the AC power source before making any connections or disconnections to the battery, preventing accidental shocks.
Do not attempt to charge non-rechargeable batteries, as this can cause them to leak or explode, posing a significant safety hazard.
Keep children and unauthorized personnel away from the charging area to prevent accidental contact or misuse of the equipment.
Electrical Safety
Ground Fault Circuit Interrupter (GFCI) outlets are crucial for safety; DieHard models often include them to protect against electrical shock in damp environments.
Always ensure the power outlet is properly grounded and matches the charger’s voltage requirements to prevent electrical hazards.
Never expose the charger to rain or moisture; indoor use is recommended to minimize the risk of electrical shock or damage.

Inspect the AC power cord regularly for any signs of damage, such as cracks or fraying, and replace it immediately if necessary.
Avoid using extension cords unless absolutely necessary; if used, ensure it’s a heavy-duty cord rated for the charger’s amperage;
Do not attempt to disassemble or repair the charger yourself; qualified personnel should handle any electrical repairs.
Unplug the charger from the power outlet when not in use, reducing the risk of accidental shock or energy consumption.
Battery Safety

Batteries produce explosive gases during charging – ensure adequate ventilation to prevent gas accumulation and potential ignition.
Always wear appropriate eye protection (safety glasses or goggles) and gloves when working near batteries to shield against acid splashes.
Avoid smoking or bringing open flames near batteries, as hydrogen gas is highly flammable and can cause an explosion.
Never charge a frozen battery; allow it to thaw completely before attempting to charge, as freezing can cause damage or rupture.
Be cautious when handling batteries, as they contain corrosive acid that can cause severe burns; rinse immediately with water if contact occurs.
Ensure proper battery polarity (positive and negative terminals) is observed when connecting the charger to avoid short circuits and damage.
Dispose of old batteries responsibly according to local regulations; do not discard them with regular household waste.

Understanding Your Charger
Familiarize yourself with the DieHard charger’s components, including the display panel, control knobs, and switches for optimal operation and safe battery maintenance.
Charger Components Identification
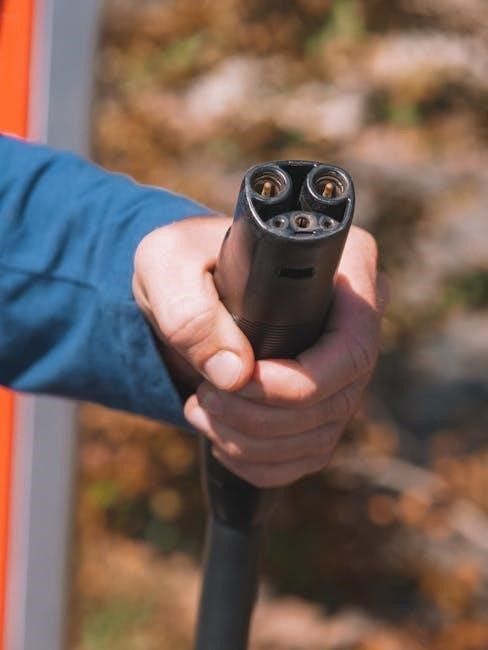
The DieHard 12V Battery Charger comprises several key components essential for safe and effective operation. These include the charging cables, typically red for positive (+) and black for negative (-), designed to securely connect to the battery terminals.
A crucial element is the GFCI (Ground Fault Circuit Interrupter) outlet, found on some models like the 71234, providing enhanced electrical safety. The charger housing protects internal circuitry, while the control panel features knobs and switches for mode selection and monitoring.
Specific models, such as 28.71221, are 12V manual chargers, differing from fully automatic versions like 200.713151. Identifying these components is vital before use, ensuring proper connection and operation according to the operator’s manual instructions.
Always refer to your specific model’s documentation for precise component locations.
Display Panel and Indicators
The DieHard 12V Battery Charger’s display panel provides crucial information regarding the charging process and battery status. Indicators commonly include LED lights signifying charging mode – such as fast charge, slow charge, or maintenance mode – and battery condition (charging, full, or fault).
Some models feature a voltage or amperage display, allowing users to monitor the current being delivered to the battery. The panel may also incorporate indicators for reverse polarity connection, alerting the user to incorrect cable attachment.
Understanding these indicators is paramount for safe and efficient charging. A flashing light might signal an error, while a steady light confirms normal operation. Refer to your specific model’s manual for a detailed explanation of each indicator’s meaning and appropriate action.
Control Knobs and Switches
DieHard 12V Battery Chargers utilize control knobs and switches to manage charging parameters and operational modes. A primary switch typically selects between battery charging and engine starting functions. Charging rate selection is often achieved via a knob, allowing users to choose between fast, slow, or automatic charging modes.
Some models feature an amperage selector, enabling adjustment of the charging current based on battery capacity. Switches may also control features like desulfation or equalization, designed to restore battery health. The engine starting function is usually activated by a dedicated switch or button.
Familiarize yourself with the function of each control before operation. Incorrect settings can damage the battery or charger. Always consult the owner’s manual for specific instructions related to your DieHard model.

Charging Procedures
Proper charging involves battery preparation, secure connection, mode selection, and consistent monitoring, ensuring optimal performance and longevity for your DieHard 12V battery.
Preparing the Battery for Charging
Before initiating the charging process, a thorough battery inspection is crucial for safety and effectiveness. Begin by visually examining the battery case for any cracks or leaks, indicating potential damage. If damage is present, discontinue use and consider replacement.
Ensure the battery terminals are clean and free from corrosion. Corrosion hinders proper electrical contact, reducing charging efficiency. Use a wire brush or a specialized battery terminal cleaning tool to remove any buildup.
Check the electrolyte level in non-sealed batteries. If low, carefully add distilled water to the appropriate level, avoiding overfilling. Always wear appropriate safety gear, including eye protection and gloves, when handling battery acid. Finally, verify the battery voltage to confirm it’s within an acceptable range for charging.
Connecting the Charger to the Battery
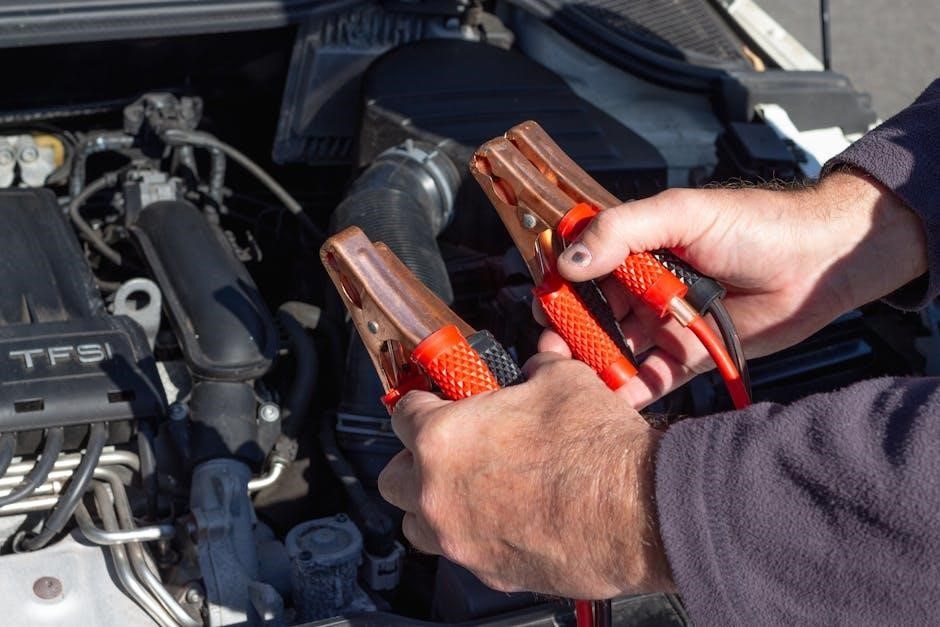
Prior to connecting the DieHard charger, ensure it is switched off to prevent accidental sparking. Identify the positive (+) and negative (-) terminals on both the charger and the battery. Incorrect polarity can cause severe damage.
Attach the red (positive) clamp to the positive terminal of the battery, and the black (negative) clamp to the negative terminal. Ensure a secure connection, avoiding loose clamps which can generate heat and reduce charging efficiency.
Double-check the polarity before proceeding. If the charger has a ground connection, connect it to a suitable grounding point on the vehicle chassis, away from the battery. Avoid connecting the charger in a confined space with poor ventilation, as charging can release flammable gases.
Selecting the Correct Charging Mode
DieHard 12V chargers often feature multiple charging modes, catering to different battery types and conditions. Consult your charger’s manual to understand each mode’s function – typically including slow, fast, and maintenance/float modes.
For deeply discharged batteries, begin with a lower amperage (slow charge) to avoid overheating and potential damage. Fully automatic models will often detect the battery’s state and adjust accordingly.
If the battery is simply depleted, a faster charge may be suitable. Always monitor the charging process, especially during fast charging, to prevent overcharging. Select the appropriate voltage (12V) setting, ensuring compatibility with your battery. Incorrect settings can lead to reduced battery life or failure.
Monitoring the Charging Process
Regularly check the charger’s display panel during operation. Most DieHard 12V chargers feature indicators showing charging status – such as charging, nearly full, and full. Pay attention to any error lights, which signal potential issues like reversed polarity or a faulty battery.
Periodically inspect the battery terminals for excessive heat, indicating a problem. A slight warmth is normal, but overheating requires immediate attention. Avoid leaving the charger unattended for extended periods, especially during initial charging;
Once the charger indicates a full charge, disconnect it from the battery and the power outlet. Continued charging can lead to overcharging and reduce battery lifespan.

Engine Starting Procedures
This section details connecting the DieHard charger for engine starting, emphasizing safe techniques and post-start procedures for optimal performance and vehicle longevity.
Connecting the Charger for Engine Starting
Before attempting to start the engine, ensure the DieHard charger is properly connected. First, verify the charger is switched off. Connect the red (positive) clamp to the positive terminal of the battery, and the black (negative) clamp to a solid, unpainted metal part of the vehicle’s chassis, away from the battery.
Crucially, avoid connecting the negative clamp directly to the battery’s negative terminal to minimize spark risk. Select the appropriate starting voltage on the charger, typically 12V. Ensure the cables are securely fastened and not tangled or touching any moving parts.
Double-check all connections before proceeding. A loose connection can prevent starting or, worse, cause damage. Refer to your vehicle’s owner’s manual for specific grounding recommendations. Proper connection is paramount for a safe and successful engine start.
Safe Engine Starting Techniques
When using the DieHard charger for engine starting, prioritize safety. Ensure the vehicle is in Park or Neutral with the parking brake firmly engaged. Turn off all accessories – headlights, radio, climate control – to conserve battery power.
Start the engine in short bursts (5-10 seconds), allowing the starter to cool down between attempts. Avoid prolonged cranking, which can overheat the starter motor. If the engine doesn’t start after several attempts, investigate the underlying issue rather than continuously cranking.
Maintain a safe distance from the battery during starting, and be aware of potential fumes. Never lean over the battery while cranking. Disconnect the charger immediately after the engine starts, following the reverse order of connection.
Post-Start Procedures
Once the engine is running, immediately disconnect the DieHard charger, following the reverse connection sequence – first the black clamp, then the red. Failure to disconnect can damage the vehicle’s electrical system and the charger itself.
Allow the engine to run for a sufficient period to recharge the battery. The duration depends on the battery’s state of discharge, but typically 30 minutes of driving is recommended. Monitor the vehicle’s charging system to ensure it’s functioning correctly.
After disconnecting, inspect the battery terminals and clamps for corrosion or damage. Clean as needed and ensure connections are secure. Store the charger in a dry, cool place, following the maintenance guidelines outlined in the manual.
Maintenance and Troubleshooting
Regular cleaning, proper storage, and addressing common issues—like fuse replacement—ensure optimal performance and longevity of your DieHard 12V charger, as detailed in this manual.
Cleaning and Storage
Maintaining your DieHard 12V Battery Charger is crucial for its longevity and performance. Before cleaning, always disconnect the charger from both the AC power source and the battery. Use a damp cloth to wipe down the exterior casing, removing any dirt or debris. Avoid using harsh chemicals or solvents, as these can damage the plastic components.
Ensure the charger is completely dry before storing it. Store the charger in a cool, dry place, away from direct sunlight and extreme temperatures. Proper storage prevents corrosion and ensures the internal components remain in good working order. It’s recommended to loosely coil the charging cables to prevent kinks and damage. Keep the manual readily available for future reference, especially regarding safety precautions and troubleshooting steps. A clean and properly stored charger will provide years of reliable service.
Common Problems and Solutions
If your DieHard 12V Battery Charger isn’t functioning, first verify the AC power source and ensure the charger is properly plugged in. A blown fuse is a frequent issue; check and replace it with a fuse of the correct amperage rating. If the battery isn’t charging, confirm the connections to the battery terminals are clean and secure.
Reverse polarity can also prevent charging – double-check the red and black clamps. If the charger displays an error, consult the manual for specific error code definitions. For engine starting issues, ensure the cables are connected correctly and the battery has sufficient charge. If problems persist, avoid attempting repairs yourself; contact a qualified technician. Remember safety first – always disconnect power before troubleshooting.
Fuse Replacement
Before replacing the fuse on your DieHard 12V Battery Charger, always disconnect the charger from both the AC power outlet and the battery. Locate the fuse holder, typically found near the AC power input. Carefully remove the fuse holder cover and inspect the fuse for a broken filament.
Replace the blown fuse with a new fuse of the exact same amperage rating – using a different rating can damage the charger or create a safety hazard. Ensure the new fuse is securely seated in the holder before replacing the cover. If the new fuse blows immediately, there’s likely an internal problem with the charger requiring professional service. Never attempt to bypass or repair a fuse; always replace it.
Warranty Information
DieHard products are warranted against defects in materials or workmanship for three years from the purchase date, ensuring reliable performance and customer satisfaction.
This warranty covers defects under normal use, offering peace of mind with your battery charger and engine starter.
Warranty Coverage Details
This DieHard warranty specifically covers defects arising from manufacturing flaws or substandard materials used in the 12V battery charger and engine starter. It safeguards against failures occurring during intended use, providing a commitment to product quality and durability.
The warranty extends to repairing or replacing the defective unit, at DieHard’s discretion, without charge. This includes components essential for the charger’s functionality, such as transformers, diodes, and control circuitry. However, the warranty does not cover damage resulting from misuse, abuse, neglect, accidents, alterations, or unauthorized repairs.
Normal wear and tear is also excluded, as is damage caused by improper voltage supply or failure to follow the operating instructions outlined in the owner’s manual. The warranty is non-transferable and applies only to the original purchaser with proof of purchase.
Warranty Claim Process
To initiate a warranty claim for your DieHard 12V battery charger, retain your original proof of purchase – a receipt or invoice – as verification of the purchase date. Contact DieHard’s customer service department, providing the model number of your charger and a detailed description of the defect.
You may be required to ship the defective unit, prepaid and properly packaged, to a designated DieHard service center for inspection. DieHard will cover return shipping costs if the claim is validated. Upon receiving the unit, technicians will assess the defect to determine if it falls under warranty coverage.
If the claim is approved, DieHard will either repair the unit or provide a replacement, at their discretion. Allow a reasonable timeframe for processing and shipping. Keep all communication records related to your claim for future reference.
Limitations of Warranty
This DieHard warranty does not cover damage resulting from misuse, abuse, neglect, accidents, alterations, or unauthorized repairs. Normal wear and tear, including cosmetic damage, is also excluded from coverage. The warranty is void if the charger has been subjected to improper voltage or current, or if safety features have been bypassed.
Furthermore, the warranty doesn’t extend to issues caused by using the charger for purposes other than its intended use, or failing to follow the operating instructions outlined in the owner’s manual. Incidental or consequential damages are specifically excluded.
DieHard reserves the right to refuse warranty claims if the product shows evidence of tampering or if the serial number has been removed or defaced. This warranty is non-transferable and applies only to the original purchaser.
Technical Specifications
DieHard 12V chargers offer varying voltage and current outputs, supporting multiple charging modes for diverse battery types, with dimensions and weights differing by model.
Voltage and Current Output
DieHard 12V battery chargers are designed to deliver consistent and reliable power for a variety of automotive, marine, and recreational battery needs. The specific voltage and current output capabilities vary depending on the model of the charger. Generally, these chargers provide a stable 12V output, crucial for charging standard lead-acid batteries.
Current output is typically adjustable, ranging from a lower amperage for trickle charging to higher amperages for faster charging and engine starting assistance. Models like the 71234 and 200.713151 offer multiple amperage settings to accommodate different battery sizes and states of discharge. The manual 28.71221 model also provides selectable current levels.
Understanding the battery’s amp-hour (Ah) rating is essential when selecting the appropriate charging current. Using a higher amperage than recommended can damage the battery, while a lower amperage will significantly extend the charging time. Always consult the battery manufacturer’s specifications for optimal charging parameters.
Charging Modes Supported
DieHard 12V battery chargers offer a range of charging modes to cater to diverse battery types and conditions. Many models, including the 200.713151, are “fully automatic,” intelligently cycling through different stages to optimize the charging process. These stages typically include desulfation, bulk charge, absorption, and float/maintenance modes.
Manual chargers, like the 28.71221, require the user to select the appropriate charging rate based on the battery’s size and state of discharge. Some models support both standard and fast charging options. Desulfation mode helps to recover batteries that have been sitting idle for extended periods, while float mode maintains a full charge without overcharging.
The 71234 model incorporates advanced features like battery testing to assess battery health before charging; Understanding these charging modes ensures efficient and safe battery maintenance, extending battery life and performance.
Physical Dimensions and Weight
Specific physical dimensions and weight vary between DieHard 12V charger models. However, these chargers are generally designed for portability and ease of storage. The 71234 Automatic Battery Charger/Engine Starter, for example, is built with a robust casing for durability during transport and use in various environments.
While precise measurements aren’t universally detailed in available documentation, these units typically range in size from approximately 10 to 15 inches in length, 6 to 8 inches in width, and 8 to 10 inches in height. Weight generally falls between 10 to 20 pounds, depending on the features and internal components.
These dimensions and weight allow for convenient placement in garages, workshops, or vehicle trunks. The chargers are designed to be manageable for most users, facilitating easy setup and operation.