
Relion Glucometer Manual: A Comprehensive Guide
Welcome! This detailed manual provides essential instructions for effectively using your Relion glucometer, ensuring accurate blood glucose monitoring and overall wellness management․
The Relion glucometer is a vital tool designed for individuals managing diabetes, offering a convenient and reliable method for monitoring blood glucose levels at home․ This device empowers you to proactively participate in your healthcare, making informed decisions about your diet, exercise, and medication․
Regular blood glucose monitoring is crucial for maintaining optimal health and preventing potential complications associated with both type 1 and type 2 diabetes․ The Relion system is engineered for accuracy and ease of use, providing clear and concise results quickly․
This manual will guide you through every step, from initial setup and testing procedures to understanding your results and maintaining your glucometer․ We aim to provide a comprehensive resource, ensuring you feel confident and comfortable utilizing this important health management device․ Remember to consult your healthcare provider for personalized guidance․
What’s Included in the Box?
Upon opening your Relion glucometer kit, please verify that all components are present․ This ensures you have everything needed for immediate and accurate blood glucose monitoring․ The kit typically includes the following essential items:

Relion Glucometer Device: The primary unit for measuring your blood glucose levels․
Lancing Device: Used to gently obtain a small blood sample from your fingertip․
Test Strips (Initial Supply): These strips react with your blood sample to provide a glucose reading․
Control Solution: Used to verify the accuracy of your glucometer and test strips․
User Manual (This Document): A comprehensive guide to operating and maintaining your Relion glucometer․
If any items are missing or appear damaged, please contact customer support for assistance before proceeding․ Proper functionality relies on having all listed components․
2․1 Glucometer Device
The Relion Glucometer Device is the core component of your blood glucose monitoring system․ It’s designed for ease of use and provides rapid, accurate readings․ The device features a clear LCD screen displaying your blood glucose level, date, and time․ It also incorporates a test strip port where you insert the test strip before applying your blood sample․
The glucometer is powered by batteries (typically included), and features simple button operation for turning the device on/off, initiating a test, and accessing memory recall functions (depending on the model)․ The exterior casing is designed to be durable and easy to clean․ Familiarize yourself with the button layout and screen display before performing your first test․
Always handle the device with care, avoiding drops or exposure to extreme temperatures or moisture․
2․2 Lancing Device
The Relion Lancing Device is used to obtain a small blood sample from your fingertip․ It utilizes a lancet – a small, sterile needle – to quickly and efficiently puncture the skin․ The device features an adjustable depth setting, allowing you to customize the penetration level based on your skin type and preference․ Lower settings are generally suitable for thinner skin, while higher settings may be needed for thicker skin․
Before each use, ensure a fresh, sterile lancet is properly inserted into the device․ The lancing device typically includes a release button to trigger the puncture․ After use, safely dispose of the used lancet in a sharps container․
Proper use of the lancing device minimizes discomfort and ensures an adequate blood sample for accurate testing․
2․3 Test Strips (Initial Supply)
Your Relion Glucometer kit includes an initial supply of test strips, specifically designed for use with your meter․ These strips are crucial for measuring your blood glucose levels․ Each strip contains a chemically treated area that reacts with the blood sample to generate a reading․
Important: Only use Relion test strips that are specifically designed for your particular Relion glucometer model․ Using incompatible strips will result in inaccurate readings․ Always check the expiration date on the test strip vial before use; expired strips can yield unreliable results․
Store test strips in a cool, dry place, and keep the vial tightly closed to protect them from moisture and air․ Handle strips with clean, dry hands to avoid contamination․
2;4 Control Solution
The Relion Glucometer kit also contains a control solution․ This liquid is not for use on your body; instead, it’s used to verify that your glucometer and test strips are working correctly․ Regularly running a control test ensures the accuracy of your results and helps identify potential issues with the system․
How to use it: Apply a small drop of control solution to a test strip as if it were a blood sample․ The meter should display a result within the expected control range, as indicated on the control solution vial․ If the result falls outside this range, troubleshoot the system before testing your blood glucose․
Store the control solution bottle tightly closed in a cool, dry place, away from direct sunlight․ Do not reuse the control solution once the bottle has been opened․
2․5 User Manual (This Document)
This comprehensive user manual serves as your primary guide to understanding and operating your Relion glucometer effectively․ It details every aspect of the device, from initial setup and testing procedures to troubleshooting and maintenance․ Please read this manual thoroughly before using the glucometer for the first time․
Within these pages, you’ll find clear, step-by-step instructions accompanied by helpful diagrams to ensure a smooth and accurate testing experience․ We’ve included information on interpreting your results, recognizing potential issues, and maintaining your device for optimal performance․
Keep this manual in a safe and accessible location for future reference․ If you have any questions or require further assistance, please consult the contact information provided at the end of this document․
Understanding Blood Glucose Monitoring
Regular blood glucose monitoring is a cornerstone of diabetes management, empowering you to make informed decisions about your health․ This process involves measuring the amount of glucose (sugar) in your blood at specific times throughout the day․ Consistent monitoring helps identify patterns and trends, allowing for adjustments to diet, exercise, and medication as needed․
Understanding why you’re monitoring is crucial․ It’s not simply about obtaining a number; it’s about understanding how different factors – meals, activity, stress – impact your glucose levels․ This knowledge enables proactive management and helps prevent both short-term discomfort and long-term complications․

Your healthcare provider will guide you on the frequency and timing of testing, tailored to your individual needs and treatment plan․
3․1 Why Monitor Blood Glucose?
Monitoring your blood glucose provides vital insights into how your body responds to food, physical activity, and medication․ For individuals with diabetes, consistent monitoring is essential for maintaining stable blood sugar levels and preventing both immediate and long-term health complications․
Regular testing helps you understand how different foods affect your glucose, allowing for informed dietary choices․ It also reveals how exercise impacts your levels, enabling you to optimize your activity routine․ Furthermore, monitoring assists in determining the effectiveness of your prescribed medications, ensuring they are working as intended․
Ultimately, self-monitoring empowers you to actively participate in your diabetes management and improve your overall well-being․
3․2 Target Blood Glucose Ranges
Target blood glucose ranges vary depending on individual factors, including age, type of diabetes, and overall health․ However, general guidelines exist for both fasting (before meals) and postprandial (after meals) levels․
For most adults with diabetes, a typical fasting blood glucose target is between 80-130 mg/dL․ After meals (1-2 hours), the target range is generally 80-180 mg/dL․ These are guidelines and your healthcare provider will establish personalized targets based on your specific needs․
Individuals without diabetes typically maintain fasting levels below 100 mg/dL and postprandial levels below 140 mg/dL․ It’s crucial to discuss your ideal ranges with your doctor to ensure effective diabetes management and minimize potential health risks․
Setting Up Your Relion Glucometer
Initial setup is crucial for accurate readings․ Before your first test, ensure the glucometer is properly prepared․ This involves a few simple steps to guarantee reliable results․ Begin by carefully examining all components to familiarize yourself with the device and its parts․
The first step is inserting the battery, followed by setting the correct date and time․ Accurate time-stamping is vital for tracking trends in your blood glucose levels․ Some Relion models offer memory recall functionality; if yours does, configure this feature according to the user manual’s instructions․
Proper setup ensures the glucometer functions optimally and provides consistent, dependable data for effective diabetes management․ Take your time and follow each step carefully․
4․1 Inserting the Battery
Powering your Relion glucometer is straightforward․ Locate the battery compartment, typically on the back or side of the device․ Gently slide off the battery cover – avoid using excessive force․ Insert the battery, paying close attention to the polarity markings (+ and -) inside the compartment․ Incorrect insertion will prevent the device from powering on․
Ensure the battery snaps securely into place․ Replace the battery cover until it clicks shut․ A properly installed battery will illuminate the display screen when the power button is pressed; If the screen remains blank, double-check the battery’s orientation and ensure it’s a fresh, compatible battery type (usually AAA or AA)․

Regular battery checks are recommended for consistent performance․
4․2 Setting the Date and Time
Accurate date and time settings are crucial for tracking your blood glucose readings effectively․ Begin by pressing the “Menu” or “Set” button on your Relion glucometer – refer to your specific model’s button layout․ Navigate to the “Date” setting using the up/down arrow buttons․ Adjust the year, month, and day sequentially, confirming each selection with the “Set” or “Enter” button․
Next, proceed to the “Time” setting․ Adjust the hour and minute, again confirming each selection․ Some models may also allow you to choose a 12-hour or 24-hour time format․ Once both the date and time are correctly set, press the “Menu” or “Set” button again to save your changes and exit the setting mode․ Verify the displayed date and time to ensure accuracy․
4․3 Setting Memory Recall (If Applicable)
Certain Relion glucometer models feature a memory recall function, allowing you to review past blood glucose readings․ To activate or configure this feature, access the “Menu” or “Set” button on your device․ Look for options like “Memory,” “Recall,” or “History․” If a memory recall setting exists, you may be able to adjust the number of readings stored or the time interval for automatic data saving․
Navigate through the menu using the up/down arrow buttons and confirm selections with the “Set” or “Enter” button․ Some models allow you to view average readings over 7, 14, or 30 days․ Refer to your specific model’s display to understand how to scroll through stored data․ Properly configured memory recall aids in identifying trends and managing your blood glucose levels effectively․
Performing a Blood Glucose Test
Accurate testing requires careful adherence to these steps․ Begin by ensuring your hands are clean and dry․ Insert a new test strip into the glucometer; the device will typically power on automatically․ Prepare the lancing device with a fresh lancet, adjusting the depth setting as needed for your skin type․ Select a testing site – typically the fingertip, but alternative sites may be suitable after consulting your healthcare provider․
Using the lancing device, gently prick the chosen site to obtain a small blood droplet․ Apply the blood sample to the designated area on the test strip, ensuring sufficient blood is drawn in․ The glucometer will then display your blood glucose reading within a few seconds․ Record your result and any relevant information, like meal times or medication intake․
5․1 Washing Your Hands
Thorough handwashing is crucial for accurate blood glucose readings․ Before each test, wash your hands with warm water and soap, even if they appear clean․ Rub your hands together vigorously for at least 20 seconds, ensuring you clean between your fingers and under your nails․ Rinse completely to remove all soap residue․
After washing, dry your hands thoroughly with a clean towel․ Any remaining moisture, food particles, or lotions can interfere with the test results, leading to inaccurate readings․ Avoid using alcohol-based hand sanitizers immediately before testing, as the alcohol can also affect the accuracy․ Clean, dry hands are essential for reliable blood glucose monitoring and effective diabetes management․
5․2 Preparing the Lancing Device
Proper lancing device preparation ensures a comfortable and effective blood sample collection․ First, remove the protective cap from a new, sterile lancet․ Insert the lancet firmly into the lancing device, following the device’s specific instructions – typically a twisting motion․ Adjust the depth setting on the lancing device according to your skin type; start with a shallower setting and increase if needed to obtain an adequate blood drop․
Cock the lancing device according to the manufacturer’s directions, preparing it for use․ Ensure the device is loaded correctly before attempting to prick your finger; Always use a fresh, sterile lancet for each test to prevent infection and minimize discomfort․ Never reuse lancets, as this can dull the needle and increase pain․
5․3 Obtaining a Blood Sample
After preparing the lancing device, select a fingertip – the sides are generally less sensitive․ Gently massage your finger towards the puncture site to encourage blood flow․ Press the lancing device firmly against your chosen fingertip and press the release button․ Avoid squeezing the finger excessively, as this can dilute the sample with tissue fluid and affect accuracy․
A small drop of blood should form․ If the blood drop is insufficient, gently massage again, avoiding excessive squeezing․ Wipe away the first drop of blood with a clean, dry cloth, as it may contain tissue fluid․ The subsequent drop is ideal for testing․ Ensure the blood drop is large enough to completely fill the test strip’s sample area for a reliable reading․
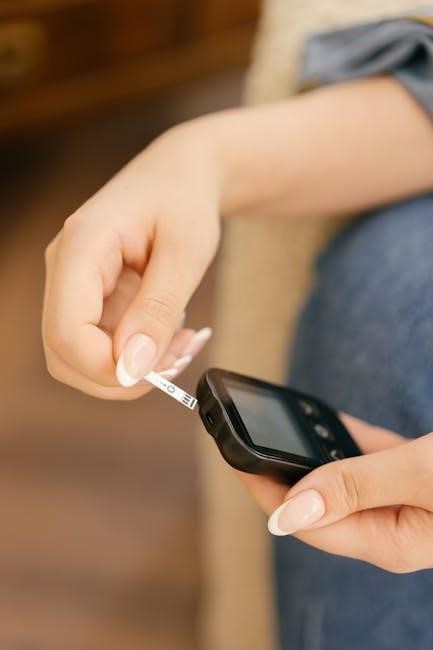
5․4 Applying Blood to the Test Strip
With a sufficient blood drop obtained, gently touch the edge of the test strip to the blood․ Do not smear or wipe the blood onto the strip; allow the strip to draw the blood in through capillary action․ The test strip will typically have a designated sample area – ensure the blood makes contact with this area․
The glucometer will usually begin counting down or display a symbol indicating it’s analyzing the sample․ Avoid adding more blood to the strip after the initial application․ Hold the strip in place until the glucometer beeps or displays a result․ Improper application can lead to inaccurate readings or error messages, so follow the instructions carefully for optimal performance․
5․5 Reading Your Blood Glucose Result
After the countdown, your blood glucose result will be displayed on the glucometer’s screen․ The reading is typically shown in milligrams per deciliter (mg/dL)․ Note the number displayed and compare it to your target range, as determined by your healthcare provider․
Some Relion glucometers may also display indicators such as “High” or “Low” if the reading falls outside the normal range․ The device might also store previous readings in its memory, accessible via the memory recall function (if equipped)․ Record your results in a logbook or utilize a compatible app for tracking trends and sharing information with your doctor․ Always interpret your results in consultation with a healthcare professional․

Understanding Your Results
Your blood glucose readings provide valuable insights into your body’s response to food, exercise, and medication․ Consistently monitoring these levels empowers you to make informed decisions about your health․ However, interpreting these results requires understanding what constitutes normal, high, and low readings․
Remember, target ranges vary based on individual factors and your healthcare provider’s recommendations․ Generally, readings before meals should fall within a specific range, and readings two hours after meals should be within another․ Deviations from these ranges – either consistently high or low – warrant discussion with your doctor to adjust your management plan accordingly․
6․1 High Blood Glucose (Hyperglycemia)
High blood glucose, also known as hyperglycemia, occurs when there’s too much sugar in your bloodstream․ Common causes include missing medication doses, overeating, insufficient physical activity, illness, or stress․ Symptoms can include increased thirst, frequent urination, blurred vision, fatigue, and slow-healing sores․
If your reading is consistently above your target range, don’t panic, but don’t ignore it either․ Check for patterns – what did you eat, how much exercise did you get, and were you feeling unwell? Record these observations․ Contact your healthcare provider if hyperglycemia persists or if you experience severe symptoms․ They may adjust your medication or lifestyle recommendations․

6․2 Low Blood Glucose (Hypoglycemia)
Low blood glucose, or hypoglycemia, happens when your blood sugar levels drop too low․ This can occur from taking too much insulin, skipping meals, exercising intensely without adequate carbohydrate intake, or consuming alcohol․ Symptoms include shakiness, sweating, dizziness, confusion, hunger, irritability, and in severe cases, loss of consciousness․
If your reading is below your target range, immediately consume 15-20 grams of fast-acting carbohydrates, such as glucose tablets, fruit juice, or regular soda․ Wait 15 minutes and retest․ If levels remain low, repeat the process․ Always carry a quick source of glucose with you․ Inform family and friends about your condition and how to assist you in case of a severe hypoglycemic episode․ Contact your doctor if hypoglycemia becomes frequent․
Glucometer Maintenance and Care
Regular maintenance ensures the accuracy and longevity of your Relion glucometer․ Avoid exposing the device to extreme temperatures or humidity․ Cleaning: Gently wipe the exterior of the glucometer with a slightly damp cloth after each use․ Do not immerse it in water or use harsh cleaning agents․
Test Strip Storage: Store test strips in their original container, tightly closed, in a cool, dry place․ Avoid direct sunlight and heat․ Do not use expired test strips, as they may yield inaccurate results․ Control Solution: Use control solution periodically (as recommended – see section 7․3) to verify the glucometer and test strips are functioning correctly․ Dispose of used lancets and test strips properly in a sharps container;
7․1 Cleaning the Glucometer
Maintaining cleanliness is crucial for accurate readings and preventing contamination․ After each use, gently disconnect any attached test strip or lancing device․ Use a soft, slightly damp cloth – do not saturate – to wipe down the entire exterior surface of the glucometer․ Pay particular attention to the test strip port, ensuring no blood residue remains․

Avoid harsh chemicals, abrasive cleaners, or solvents, as these can damage the device․ Never immerse the glucometer in water or any other liquid․ Ensure the device is completely dry before reattaching any components or performing another test․ Regular cleaning contributes significantly to the reliable performance and extended lifespan of your Relion glucometer․
7․2 Test Strip Storage
Proper storage of your Relion test strips is vital for maintaining their accuracy and effectiveness․ Always store the test strips in their original vial, tightly closed to protect them from humidity, heat, and light․ Avoid transferring strips to other containers, as this can compromise their integrity․
Keep the vial in a cool, dry place, ideally between 60°F and 86°F (16°C and 30°C)․ Do not store test strips in bathrooms or near sources of moisture․ Check the expiration date on the vial before each use; expired strips can yield inaccurate results․ Discard any strips that appear damaged or discolored․ Following these guidelines ensures reliable blood glucose measurements․
7․3 Control Solution Usage & Frequency
Control solution verifies your glucometer and test strips are functioning correctly․ Use it when you first receive your meter, after changing battery, or if you suspect inaccurate readings․ Do not use control solution to calibrate the meter; it’s for performance checks only․
To use, apply a drop of control solution to a test strip as if it were a blood sample․ The meter should display a result within the control range specified on the vial․ If the result falls outside this range, do not use the meter and contact customer support․ Frequency of control solution testing depends on usage; generally, once a week is recommended for regular users, or more often if needed․
Troubleshooting Common Issues
Encountering problems? This section addresses frequent issues․ First, check the battery – a low battery can cause inaccurate readings or meter malfunction․ Error messages indicate specific problems; consult the error code list in section 8․1 for detailed explanations and solutions․
If you receive consistently inaccurate readings, ensure proper testing technique (see section 5)․ Expired or improperly stored test strips (section 7․2) are a common cause․ Also, verify the lancing device depth is appropriate for your skin type․ If issues persist, do not self-treat; contact Relion customer support for assistance․ Always record any error messages or unusual results before contacting support․
8․1 Error Messages and Their Meanings
Understanding error codes is crucial for effective troubleshooting․ “E1” typically indicates a test strip error – ensure proper insertion and that the strip isn’t damaged or expired․ “E2” suggests insufficient blood sample; re-test with a larger drop․ “E3” often means the control solution result is outside the acceptable range, indicating potential meter or strip issues․
“E4” signals a potential internal meter error; contact customer support․ “Lo” displays when the blood glucose level is below the meter’s measurable range․ “Hi” indicates a level above the measurable range․ Always refer to the full error code list in the complete user manual (available online) for a comprehensive explanation and recommended actions․ Never ignore error messages!

8․2 Inaccurate Readings – Potential Causes
Several factors can contribute to inaccurate blood glucose readings․ Expired or damaged test strips are a common culprit; always check the expiration date and ensure proper storage․ Improper testing technique, such as insufficient blood sample size or applying blood to the wrong area of the strip, can also cause errors․ Environmental factors like extreme temperatures or humidity can affect strip performance․
Contamination – on fingers, the lancing device, or the meter – can skew results․ Meter malfunction is possible, though less frequent․ Dehydration or certain medications can also influence readings․ Regularly perform control solution tests to verify meter accuracy and consult your healthcare provider if inconsistencies persist․
Safety Precautions
Always handle the lancing device with care, as it contains a sharp needle․ Never share your glucometer, lancing device, or test strips with others to prevent infection․ Dispose of used lancets properly in a sharps container, following local regulations․ If you are pregnant or have other health conditions, consult your doctor before using this device․
Keep the glucometer and test strips out of reach of children․ Do not attempt to disassemble or repair the glucometer yourself․ Clean the device regularly as instructed to maintain hygiene․ Seek medical attention if you experience persistent discomfort or unusual results․ This device is for self-testing only and should not replace professional medical advice․