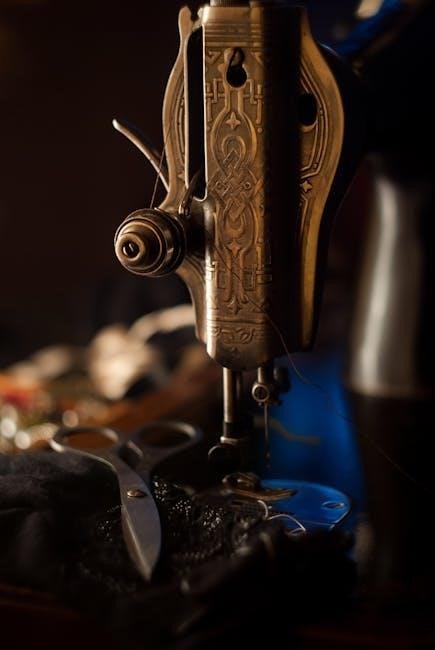
Singer Sewing Machine Troubleshooting Manual: An Overview
Singer sewing machines‚ renowned for their longevity‚ sometimes require troubleshooting; this manual details common issues like thread bunching‚ skipped stitches‚ and motor problems.
Singer sewing machines‚ celebrated for over 170 years of innovation‚ occasionally present operational challenges. These issues range from simple fixes‚ like re-threading or changing a needle‚ to more complex problems requiring detailed examination. Common complaints include thread bunching beneath the fabric‚ skipped stitches disrupting the seam‚ and the frustrating experience of a broken needle.
Understanding these potential problems is the first step towards maintaining your machine’s performance. Regular maintenance‚ utilizing quality threads and needles‚ and promptly addressing minor issues can prevent significant repairs. This guide provides a structured approach to diagnosing and resolving typical Singer sewing machine malfunctions‚ ensuring continued sewing enjoyment.
Understanding Common Problems
Several issues frequently plague Singer sewing machines. Thread bunching often stems from improper threading or tension settings‚ while skipped stitches frequently indicate a dull or damaged needle‚ or timing disruptions within the machine. Needle breakage is commonly linked to using the incorrect needle type for the fabric being sewn‚ or excessively tight thread tension.
Uneven stitching can result from incorrect tension adjustments or improper foot pressure. Motor failures‚ though less common‚ can be caused by power cord issues or internal component malfunctions. Recognizing these patterns allows for targeted troubleshooting‚ saving time and potential repair costs.
Basic Troubleshooting Steps
Begin with simple checks: re-threading the machine‚ replacing the needle‚ and ensuring correct bobbin winding and insertion are crucial first steps.
Thread Issues: A Primary Concern
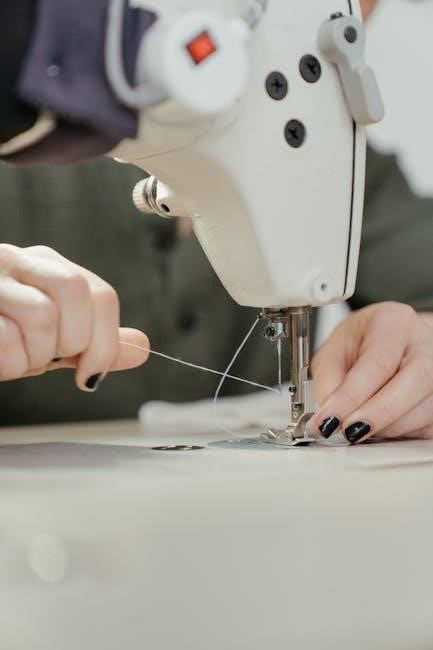
Thread problems are frequently encountered with Singer sewing machines‚ often manifesting as breaks‚ tangles‚ or inconsistent stitching. Utilizing high-quality thread is paramount; cheaper threads can fray and cause significant issues. Ensure the thread path is clear of obstructions and correctly guided through all tension discs and guides. Incorrect threading is a common culprit.
Adjusting thread tension is vital – too loose results in looping‚ while too tight can cause breaks. Experiment with slight adjustments to find the optimal setting for your fabric and thread combination. Regularly cleaning the tension discs removes lint buildup that impedes smooth thread flow. Remember to match the thread weight to the needle size for best results.
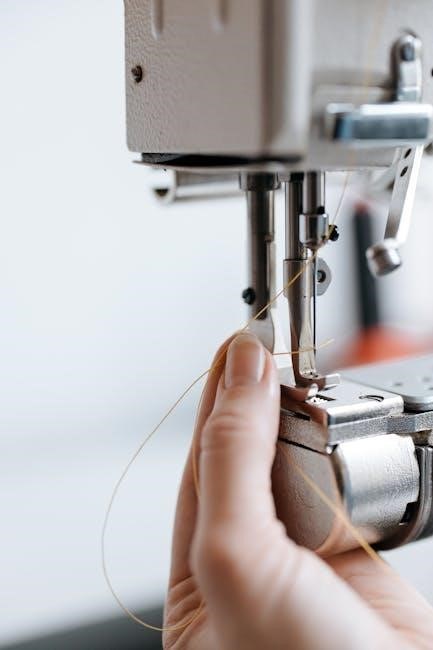
Needle Problems and Solutions
Needle issues are a frequent source of sewing machine malfunctions. A bent or damaged needle causes skipped stitches and potential fabric damage. Always replace a dull or bent needle immediately. Selecting the correct needle type for your fabric is crucial; universal needles work for many fabrics‚ but ballpoint needles are best for knits‚ and leather needles for leather.
Ensure the needle is correctly inserted – fully pushed up into the needle clamp. Incorrect insertion can lead to breakage. If the needle repeatedly breaks‚ check thread tension and ensure you’re not forcing the fabric. A blunt needle point can also cause problems; replace it promptly.

Bobbin Winding and Insertion
Proper bobbin winding is essential for consistent stitch quality. Ensure the thread is correctly guided through the bobbin winder tension disc; insufficient tension results in loosely wound bobbins‚ causing uneven stitching. Wind the bobbin evenly‚ avoiding overfilling. When inserting the bobbin‚ consult your machine’s manual for the correct direction – front or top loading systems differ.
A correctly inserted bobbin should move freely and smoothly. Incorrect insertion can cause thread nests and tension issues. Use quality thread for winding to prevent breakage and ensure consistent tension. Regularly clean the bobbin area to remove lint and debris‚ which can interfere with smooth operation.
Specific Singer Sewing Machine Problems & Fixes
This section addresses frequent Singer machine malfunctions‚ offering targeted solutions for issues like thread bunching‚ skipped stitches‚ and broken needles‚ ensuring smooth operation.
Thread Bunching Under the Needle
Identifying the Causes of Thread Bunching is crucial for resolving this common Singer sewing machine issue. Often‚ improper threading of the upper thread or incorrect bobbin insertion are primary culprits. Lint accumulation beneath the needle plate significantly contributes‚ disrupting smooth thread flow. Using low-quality thread or an incorrect needle type for the fabric also exacerbates the problem. Furthermore‚ incorrect thread tension—too loose on top or too tight on the bobbin—can lead to frustrating thread nests.
Identifying the Causes of Thread Bunching
Thread bunching typically stems from a few key areas within your Singer machine. Incorrect threading of the upper thread is a frequent offender; ensure it follows the designated path precisely. Improper bobbin insertion‚ or a poorly wound bobbin‚ disrupts tension. Accumulated lint and debris under the needle plate obstruct smooth thread movement. Using the wrong needle type for your fabric weight‚ or low-quality thread‚ increases friction. Finally‚ imbalances in thread tension – too loose on top‚ or too tight in the bobbin – are common causes.
Correcting Thread Bunching Issues
To resolve thread bunching‚ re-thread the upper thread‚ verifying each guide is correctly engaged. Remove the bobbin and rewind it evenly‚ then reinsert it with the correct tension setting. Thoroughly clean the bobbin area‚ removing all lint and debris. Switch to a needle appropriate for your fabric – a universal needle often works well. Experiment with thread tension adjustments; slightly tighten the upper tension. If problems persist‚ try higher quality thread. Regularly cleaning your Singer machine prevents future build-up and ensures smooth operation.
Skipped Stitches: Diagnosis and Repair
Skipped stitches frequently indicate a needle issue or timing disruption within your Singer machine. Begin by replacing the needle with a new one of the correct size and type for your fabric. Ensure the needle is fully inserted and properly engaged. Clean the needle plate area‚ removing any accumulated lint or thread fragments. If the issue continues‚ a timing disruption may be present‚ requiring professional servicing. Do not attempt to adjust the timing yourself‚ as this can cause further damage. Regularly inspect your needle for bends or damage.
Needle Condition and Replacement
A damaged or dull needle is a primary cause of skipped stitches. Regularly inspect your Singer needle for any bends‚ burrs‚ or bluntness. Even slight imperfections can disrupt the stitching process. When replacing‚ always use the correct needle type and size recommended for your fabric weight. Ensure the needle is fully inserted into the needle clamp and securely tightened. A loose needle will cause inconsistent stitches. Replace the needle frequently‚ even if it appears undamaged‚ to maintain optimal sewing performance and prevent fabric damage.
Timing Disruption and Professional Help
If skipped stitches persist after needle replacement‚ a timing disruption within your Singer machine may be the culprit. This involves the synchronization between the needle‚ bobbin‚ and feed dogs. Attempting to adjust the timing yourself is strongly discouraged unless you possess advanced mechanical knowledge. Incorrect adjustments can cause significant damage. Instead‚ seek assistance from a qualified Singer sewing machine technician. Professional servicing ensures accurate timing restoration‚ preventing further complications and preserving the longevity of your valuable sewing machine.
Needle Breaking: Prevention and Resolution
Frequent needle breakage is frustrating‚ but often preventable. A primary cause is using an incorrect needle type for the fabric being sewn – delicate fabrics require finer needles‚ while heavier materials need stronger ones. Thread tension that is too tight also contributes significantly to needle breaks. Always ensure the thread flows smoothly without excessive pull. Regularly inspect your needle for bends or damage; even slight imperfections can lead to breakage. When replacing‚ use high-quality needles designed for your Singer model‚ and always follow the manufacturer’s recommendations.
Incorrect Needle Type for Fabric
Selecting the right needle is crucial for successful sewing and preventing breakage. Using a universal needle on stretch fabrics‚ for example‚ can cause skipped stitches and needle failure. Delicate fabrics demand finer‚ sharper needles – size 60/8 or 70/10 – to avoid snagging. Conversely‚ denim or canvas requires robust needles‚ like size 90/14 or 100/16‚ capable of penetrating thick layers. Ballpoint needles are essential for knits‚ preventing runs and holes. Always consult your fabric’s recommendations and your Singer machine’s manual for optimal needle choices.
Thread Tension Issues Contributing to Breaks
Improper thread tension is a frequent cause of needle breakage. If the upper tension is too tight‚ it strains the thread‚ increasing the likelihood of snapping‚ especially during thicker seams. Conversely‚ excessively loose upper tension can create loops and weak stitches‚ also leading to breaks. Regularly check and adjust your Singer machine’s tension dial‚ referencing the manual for guidance. Ensure both upper and bobbin tensions are balanced for smooth‚ consistent stitching. Using low-quality thread exacerbates tension problems‚ so opt for reputable brands.
Uneven Stitching: Identifying the Root Cause
Uneven stitching often signals an imbalance in your Singer sewing machine’s settings. Incorrect thread tension is a primary culprit; adjustments to both the upper and bobbin tension are crucial for consistent stitch formation. Additionally‚ improper foot pressure can distort fabric feed‚ resulting in uneven lengths. Verify the presser foot is firmly seated and adjust the pressure dial according to the fabric weight. A dull or incorrect needle type for the material can also contribute to this issue‚ necessitating a replacement.
Incorrect Thread Tension Adjustment
Incorrect thread tension is a frequent cause of uneven stitching on a Singer machine. Too much upper tension pulls the fabric‚ creating puckering‚ while too little leads to loops on the underside. Begin by re-threading both the upper thread and bobbin‚ ensuring proper pathways. Test stitch on scrap fabric‚ incrementally adjusting the upper tension dial. Observe the stitch formation; a balanced stitch shows interlocking threads. If issues persist‚ check bobbin tension – a slight adjustment may be needed. Remember to always test changes before sewing your project!
Foot Pressure Adjustment
Uneven stitching can often be resolved by adjusting the presser foot pressure. Too much pressure can stretch delicate fabrics‚ causing puckering‚ while too little allows the fabric to slip‚ resulting in skipped stitches. Most Singer machines feature a dial to control this pressure. Lower the pressure for lightweight materials like silk or chiffon‚ and increase it for heavier fabrics like denim. Always test the adjustment on a scrap piece of the fabric you’re using to find the optimal setting for consistent‚ even stitches.

Advanced Troubleshooting
Singer machines facing complex issues—motor failures‚ timing belt problems‚ or significant lint buildup—may require deeper diagnostics and potentially professional repair services.
Motor Issues: When Your Machine Won’t Power On
When your Singer sewing machine fails to power on‚ begin with the simplest checks: ensure the power cord is securely connected to both the machine and a functioning outlet. Verify the foot pedal is also properly plugged in and operating correctly; sometimes‚ a faulty pedal is the sole culprit. If these are sound‚ the issue might lie within the motor itself. Internal motor problems often necessitate professional attention‚ as disassembly and repair can be complex and potentially dangerous. Attempting repairs without proper knowledge could void any warranty or cause further damage. Consider consulting a qualified Singer technician for diagnosis and repair of internal motor components.
Checking the Power Cord and Foot Pedal
A Singer sewing machine that won’t power on often presents a simple fix: a loose connection. First‚ meticulously inspect the power cord for any visible damage – frays‚ cuts‚ or exposed wires. Ensure it’s firmly plugged into both the machine and a working electrical outlet. Next‚ test the foot pedal. Try a different outlet to rule out an electrical issue. If the pedal still doesn’t activate the machine‚ it may be defective and require replacement. A multimeter can confirm if the pedal is sending a signal. Always disconnect power before inspecting any electrical components.
Internal Motor Problems and Repair
If the power cord and foot pedal check out‚ the issue likely resides within the Singer sewing machine’s motor. Internal problems‚ such as worn brushes or a faulty capacitor‚ often require professional attention. Attempting repairs yourself can be dangerous if you lack electrical expertise. A burning smell or unusual noises emanating from the motor are strong indicators of internal failure. Disassembling the motor should only be done by a qualified technician. Replacement motors are available‚ but professional installation is highly recommended to ensure safety and proper functionality.
Timing Belt Problems
A broken or loose timing belt severely disrupts the synchronization between the needle‚ presser foot‚ and feed dogs‚ causing skipped stitches or complete machine failure. Recognizing this issue involves observing erratic stitching or a lack of movement despite the motor running. Replacing the timing belt is a delicate procedure demanding precision; caution is strongly advised. Incorrect installation can lead to further damage. While DIY replacement is possible‚ consulting a qualified technician is recommended‚ especially for complex Singer models. Proper timing is crucial for optimal sewing performance.
Recognizing a Broken or Loose Timing Belt
Identifying a timing belt issue begins with observing inconsistent stitch formation – frequently skipped stitches are a key indicator. A visibly frayed‚ cracked‚ or completely broken belt is a clear sign of a problem. Even if intact‚ a loose belt will exhibit slack when gently pressed. Erratic machine behavior‚ where the needle doesn’t align correctly with the feed dogs‚ also suggests a timing issue. Listen for unusual noises during operation; a slipping belt can create a distinct sound. Regular inspection during maintenance can prevent catastrophic failures.
Replacing the Timing Belt (Caution Advised)
Replacing a timing belt is a complex procedure best left to qualified technicians‚ as incorrect installation can severely damage your machine. If attempting DIY repair‚ meticulously document the belt’s original routing before removal. Ensure the machine is unplugged! Carefully align the new belt‚ ensuring proper tension – too loose or too tight will cause issues. Verify correct timing by manually rotating the handwheel and observing needle/hook synchronization. Incorrect timing leads to skipped stitches or needle breakage. Proceed with extreme caution; professional assistance is strongly recommended.
Lint and Debris Buildup

Lint and thread fragments accumulate within the machine‚ hindering performance and causing malfunctions. Regular cleaning is crucial for preventative maintenance. Begin by unplugging the machine. Use a brush to remove visible lint from the bobbin area‚ feed dogs‚ and around the needle plate. A vacuum cleaner with a brush attachment can effectively remove debris from hard-to-reach areas. Periodically‚ use a lint roller on exterior surfaces. Neglecting this buildup leads to stitch issues‚ tension problems‚ and potential mechanical failures‚ shortening the machine’s lifespan.
Regular Cleaning Procedures
Consistent cleaning extends your Singer’s life and ensures optimal performance. After each use‚ brush away lint from the bobbin area‚ feed dogs‚ and needle plate. Unplug the machine before deep cleaning. Use a small brush or vacuum attachment to remove debris from internal components. A lint roller is effective for exterior surfaces. Oil moving parts as recommended in the manual. Avoid using compressed air‚ as it can push debris further inside. Schedule a thorough cleaning every six months‚ or more frequently with heavy use‚ to prevent buildup and maintain smooth operation.
Accessing and Cleaning Hard-to-Reach Areas
Cleaning deeply within a Singer requires careful access. Remove the needle plate and bobbin case to clear lint accumulation. A small brush‚ tweezers‚ or a specialized sewing machine cleaning tool can dislodge stubborn debris. Gently clean around the feed dogs and shuttle hook area. Consult your manual for specific disassembly instructions‚ as models vary. Avoid forcing parts; gentle manipulation prevents damage. After cleaning‚ reassemble carefully and ensure all components are securely in place before operating the machine. Regular access prevents major malfunctions.
Maintenance for Preventing Issues
Consistent oiling‚ proper storage with a cover‚ and utilizing quality threads and needles are crucial for preventing Singer sewing machine problems and ensuring longevity.
Regular Oil Application
Consistent lubrication is paramount for a smoothly functioning Singer sewing machine. Regularly oiling key components minimizes friction‚ preventing wear and tear on vital parts like the hook‚ shuttle‚ and motor. Refer to your machine’s manual for specific oiling points; avoid over-oiling‚ as excess can attract lint and cause issues. Use only sewing machine oil – other lubricants may damage internal mechanisms. A few drops in the designated areas after every eight hours of use‚ or monthly for infrequent users‚ will significantly extend your machine’s lifespan and maintain optimal performance. Neglecting oiling leads to increased resistance‚ potential overheating‚ and ultimately‚ costly repairs.
Proper Storage and Cover Usage
Protecting your Singer sewing machine when not in use is crucial for longevity. Always cover the machine with a dust cover to prevent lint‚ dust‚ and debris from accumulating inside. Store the machine in a dry‚ stable location‚ away from direct sunlight and extreme temperatures. Avoid storing it in damp basements or dusty attics. When transporting the machine‚ use the original packaging or a padded case. Proper storage minimizes the risk of corrosion‚ internal damage‚ and the need for frequent cleaning. A well-maintained storage environment contributes significantly to consistent‚ reliable performance.
Using Quality Thread and Needles
Employing high-quality thread and needles is paramount for smooth sewing and preventing issues. Inferior thread can break easily‚ causing tangles and frustrating interruptions. Always match the needle type and size to the fabric weight; using the wrong needle can lead to skipped stitches or needle breakage. Regularly replace needles‚ even if they don’t appear damaged‚ as they can become dull with use. Opt for reputable brands known for consistent quality. Investing in good materials minimizes problems‚ extends machine life‚ and ensures professional-looking results‚ ultimately simplifying troubleshooting.
Resources and Further Help
Singer’s official website offers manuals and support‚ while online forums provide communities for sharing solutions and gaining assistance with troubleshooting.
Singer’s Official Website and Manuals
Singer’s official website is an invaluable resource for owners seeking troubleshooting assistance and detailed information about their machines. You can typically find downloadable manuals specific to your sewing machine model‚ offering comprehensive guides to operation‚ maintenance‚ and repair. These manuals often include diagrams and step-by-step instructions for addressing common problems.
The website also frequently features FAQs‚ troubleshooting guides‚ and support articles covering a wide range of issues. Furthermore‚ Singer provides contact information for customer support‚ allowing you to reach out directly for personalized assistance if you are unable to resolve the problem independently. Utilizing these official resources ensures you’re accessing accurate and reliable information tailored to your specific Singer sewing machine.
Online Forums and Communities
Numerous online forums and communities are dedicated to sewing and Singer sewing machines‚ providing a platform for users to share experiences‚ ask questions‚ and offer solutions. These communities often contain a wealth of practical advice from experienced sewers who have encountered and resolved a wide variety of issues.
Searching these forums can reveal solutions to problems not covered in the official manuals‚ or offer alternative perspectives on troubleshooting steps. Engaging with these communities allows you to benefit from collective knowledge and receive personalized guidance from fellow Singer machine enthusiasts. Remember to provide specific details about your machine model and the issue you’re facing for the most helpful responses.